Resize vs Canvas Size vs Trim: Pick the Right One
Three items sit next to each other under the Image menu and all of them sound like "make the picture a different size". They do three unrelated things, and choosing the wrong one is how people lose sharpness or lose the edges of a photo.
Short version: Resize resamples every pixel to a new count, Canvas Size keeps the pixels and changes the sheet they sit on, Trim deletes the uniform margin around the content. The rest of this page is when to use which.
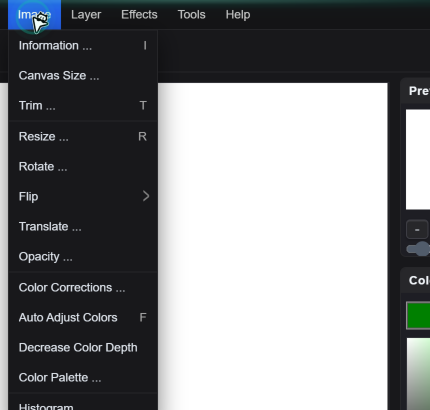
The One-Line Difference
| Menu item | What changes | Pixel count | Use it when |
|---|---|---|---|
| Image → Resize | Width, height, and every pixel inside | Changes | The file must be 1200 px wide, or under a KB limit |
| Image → Canvas Size | The sheet behind the picture | Stays the same | You need a square, a wider banner, or extra margin |
| Image → Trim | Removes surrounding uniform colour | Drops | A scan or screenshot has a fat white border |
Resize: When the Destination Counts Pixels
Image → Resize is the only one of the three that rebuilds the image at a new resolution. You can type Width and Height in pixels, or use Width (%) and Height (%) — pick one pair, not both. The dialog has three settings worth knowing:
Lanczos is the slowest and keeps the most detail when shrinking. Hermite is a middle ground. Basic is nearest-neighbour — fast, and it turns diagonal edges into visible stair-steps. For downscaling a photo, Lanczos. For pixel art you want to keep crisp, Basic is actually correct.
Tick it and the resize applies a light unsharp pass afterwards. Downscaling always softens an image slightly, so this restores apparent crispness. It is also easy to overdo on an already-sharp graphic — check at 100% zoom, not in the fitted view.
All resizes every layer and the canvas together, which is what you want in almost every case. Active resizes only the selected layer, which is how you make one sticker smaller without touching the background.
Enlarging is the case to be careful with. Going from 800 px to 2400 px invents pixels that were never captured; the result looks soft or, with Sharpen on, crunchy. There is no reconstruction here. If the goal is print, start from a bigger source.
Canvas Size: Add Space, Keep Every Pixel
Canvas Size does not touch the image data at all. It changes the sheet, and the layers keep their positions measured from the top-left corner. That last detail is the one people trip over: growing the canvas adds space on the right and bottom, so a subject that was centred ends up in the upper-left.
Read the current size in Image → Information (say 1200 × 1600). Open Canvas Size, leave In proportion unticked, set Width 1600 and Height 1600. Now the photo sits in a 1600 × 1600 sheet with empty space to the right. Fill that space, or move the layer over with Image → Translate to centre it.
Ticked, Canvas Size scales the layers along with the sheet — that is a resize wearing a different hat, and it softens the image. Unticked, the layers stay at their pixel size and only the sheet changes. For adding margin, unticked is what you want.
Besides Custom, the dialog offers preset sizes with a Portrait / Landscape layout switch. Handy when a portal asks for exactly 1920 × 1080 or 1080 × 1080: pick the preset instead of typing numbers and hoping the orientation is right.
Trim: Delete the Uniform Margin
Trim is automatic cropping. It looks inward from each edge and removes rows and columns that match a uniform colour — typically the white border around a scanned document, or the grey padding around a screenshot.
- Trim layer / Trim borders decide whether it works on the selected layer or on all borders of the canvas.
- Power (0–255) sets how tolerant the match is. At 0 only pure white is trimmed; raise it and near-white pixels count too, which is what you need for a photo of paper where the white is not actually 255.
- Trim white color? restricts the operation to white margins specifically. Untick it when the border is a colour other than white.
Trim is destructive in the sense that the removed area is gone once you continue — undo still works, but the exported file will not contain it. On a document scan, do Trim before any sharpening, so you are not sharpening empty margin.
Choosing in Five Seconds
- Upload limit or "must be exactly 1200 px" → Resize.
- "I need it square / I need white space around it" → Canvas Size, then fill or translate.
- "There is a big white border I want gone" → Trim.
- "It looks soft after shrinking" → redo the Resize with Mode Lanczos and Sharpen ticked, from the original file.
Quick Answers
Why did my subject move to the top-left corner after I changed the canvas size?
Canvas Size never moves layers. They keep their coordinates measured from the top-left of the sheet, so extra space appears on the right and bottom. Move the layer with Image → Translate, or drag it on the canvas, then fill the leftover area with a background colour.
Does Resize with sharpen actually restore detail?
No. Sharpen raises local contrast at edges, which reads as crispness, but information removed by downscaling is not recovered. It works well after a moderate downscale at 100% zoom; stacked on an already sharp graphic it produces halos and crunchy edges.
Is Trim the same as cropping with the selection tool?
Trim is automatic and only removes uniform border colour, using the Power value as tolerance. The selection tool crops exactly where you draw, which is what you want when the edge is not uniform. Use Trim for scans and screenshots, selection for everything else.
Related Tutorials
Take one photo, run Image → Information, then change the canvas to a square without resizing — and watch where the subject ends up.