Convert WebP to JPG Without Uploading Anything
You saved an image from a browser, and the file is .webp. Then a job portal says the format is not supported, or Word opens it as a blank box, or the print shop asks for JPG. Conversion here is not a re-upload to some online converter: open the file, choose the output type, save. The pixels never leave your machine.
The one thing that decides whether the conversion goes well is transparency. WebP supports an alpha channel; JPG does not. A logo cut out on a transparent background will come back on a solid colour block, and that surprises people far more often than the format itself.
Before You Convert: Check What You Actually Have
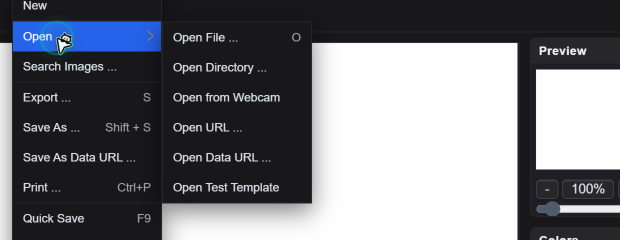
Open the file with File → Open → Open File. The supported input list covers png, jpg, jpeg, webp, gif and avif, so a WebP drops in without any intermediate step.
Then read the numbers in Image → Information: width, height and layer count. Two things matter at this point. If the image is larger than about 2000 px on the long edge and the destination is a form upload, you will probably resize as well, and it is faster to do that once here than to convert twice. If the layer panel shows a chequerboard behind the content, or the canvas edge is not filled edge to edge, you are holding a file with alpha and the next section applies to you.
Step by Step
File → Open → Open File. On the canvas, confirm the aspect ratio looks right. A WebP with an odd pixel size will show up exactly as stored; nothing is silently padded.
Chequerboard visible = the file has alpha. Keep it and export PNG. Flatten it onto white and export JPG. There is no third option: JPG has no alpha channel, so the transparent area is filled with whatever sits behind it — usually white, sometimes black depending on the viewer.
File → Export opens the save dialog. Set File name, set Save as type to JPG, and watch the Quality slider (1–100, default 90). Tick Show file size and the dialog reports the exact byte count before you commit, which is the only reliable way to know if you have cleared a 500 KB upload limit.
Lower Quality in steps of five and re-read the reported size. Quality 85 is usually indistinguishable from 95 on a photograph and often 30–40% smaller. For screenshots and line art the opposite is true: JPG adds ringing around text, so drop the colour depth or export PNG instead of pushing quality down.
Quality Settings That Actually Make Sense
| Content | Recommended | Why |
|---|---|---|
| Photographs for sharing | Quality 85–90 | Artifacts stay below what a phone screen shows |
| Product listing images | Quality 90–95 | Marketplaces sometimes re-compress; leave headroom |
| Text, screenshots, charts | PNG instead | JPG blurs edges around letters at any quality |
| Thumbnails, previews | Quality 60–75 | Small display size hides the loss |
Where This Goes Wrong
- Converting twice. JPG → WebP → JPG loses detail each pass. Keep the original file and convert once from it.
- Screenshotting instead of exporting. A screenshot of the preview is a re-render at screen resolution, with the interface colours baked in.
- Expecting a batch. The editor opens one file at a time; there is no queue. For ten files, ten passes, or resize them first so each pass is quick.
- Handing the file to a third-party compressor. The Tools → External entries (TINYPNG, SQUOOSH) open external services that receive your image. Fine for a stock photo, wrong for anything with a client's face or a contract in it.
Quick Answers
Why did my logo come back on a white or black block after converting?
JPG has no alpha channel, so the transparent area is replaced by a solid colour — white in most editors, black in some viewers. Keep the transparency and export PNG instead. If the destination insists on JPG, place the logo on a deliberate background colour first, so you choose the fill rather than inheriting it.
What quality number should I pick?
Quality 85–90 for photographs, 90–95 for product images that a marketplace may re-compress, 60–75 for thumbnails. Tick Show file size in the Export dialog and read the reported byte count — that number, not the slider position, tells you whether you cleared the upload limit.
Can I convert a whole folder of WebP files at once?
No. The editor opens one file at a time and Export writes one file. For a large batch, resize first so each pass is short, or use a desktop converter that runs locally. Avoid browser converters that upload your files.
Related Tutorials
Open one of your WebP files, export it twice — JPG at 85 and PNG — then compare the reported file sizes.