Add a Soft Drop Shadow (and Why Yours Is Invisible)
A drop shadow is the cheapest way to make a cut-out look like it exists in space rather than floating. It is also the effect most people apply and then cannot see — because a shadow is drawn behind opaque pixels, and a full-frame photo has no area where "behind" is visible.
So the rule before any slider: the layer must have transparent edges. A product cut-out, a logo, a text layer, a PNG sticker — those work. A photo that fills the canvas edge to edge will not show a shadow at all, no matter how far you push the offset.
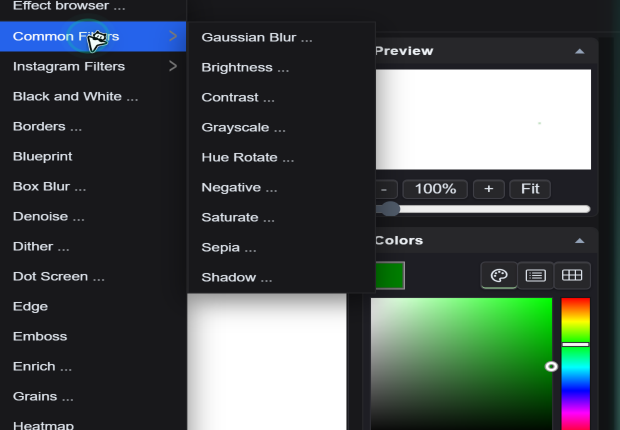
What the Dialog Actually Changes
Effects → Common Filters → Shadow opens four controls:
| Control | Range / default | What it does |
|---|---|---|
| Offset X | −100 to 100, default 10 | Horizontal displacement. Positive moves the shadow right. |
| Offset Y | −100 to 100, default 10 | Vertical displacement. Positive moves it down — the usual choice, since light comes from above. |
| Radius | 0 to 100, default 5 | Softness. 0 is a hard-edged duplicate, high values blur it into a haze. |
| Color | #000000 default | Shadow colour. Not always black — see the colour note below. |
Values are in canvas pixels, so the same numbers mean different things on a 600 px sticker and a 3000 px product shot. Judge the result at 100% zoom, not in the fitted window, where a 20 px radius looks like nothing.
Settings That Look Right
Offset Y 10–16, Offset X 0–4, Radius 12–20, black. The shadow should read as a soft contact shadow under the object. If it spreads to the sides, the radius is too high relative to the offset.
Offset Y 3–6, Radius 6–10. Tight and subtle; anything bigger turns a logo into a 2005 web button.
Change the colour away from black. On a warm background, a pure black shadow looks like dirt. Sample the background and darken it — a deep version of the same hue reads as shadow, not as a stain.
After you confirm, the shadow is applied to the layer. It is not a live adjustment, so undo (Ctrl+Z) is the only way back — or duplicate the layer first and apply the shadow to the copy, so the original stays clean.
Why Your Shadow Is Missing
- The layer covers the whole canvas. There is nowhere for the shadow to fall. Cut the subject out first.
- You applied it to the background layer. The shadow is drawn under that layer's own opaque pixels, which are everywhere, so it stays hidden.
- The shadow is under another layer. Move the shadowed layer up, or move the covering layer down.
- Offset too small for the radius. With Offset 2 and Radius 40, the shadow blurs evenly in every direction and reads as a grey halo rather than a shadow.
Making It Look Real
Real shadows are not uniform. They are darker and sharper right where the object touches the surface, and they fade as distance increases. One filter pass cannot do both, so the trick is two passes on two copies of the layer:
Duplicate the layer (Layer → Duplicate), apply Shadow with Offset Y 4, Radius 6, colour black. This is the tight dark line where the object meets the ground.
Duplicate again, apply Shadow with Offset Y 20, Radius 30, and then lower that layer's opacity in the layer panel to around 25–35%. Two overlapping shadows, one tight and dark, one wide and faint, is what a real surface does.
Keep the original cut-out on top of both. With three layers — object, contact shadow, ambient shadow — you can tune the strength later without redoing the cut-out.
Where It Belongs, and Where It Doesn't
- Good: product listings, presentation slides, portfolio thumbnails, UI mock-ups, thumbnails where the subject must separate from a busy background.
- Bad: anything going to print where the background is already white — a shadow costs ink and looks like a smudge. Photographic restorations: adding a shadow to a scanned portrait is a fabrication, not a restoration.
Quick Answers
I applied Shadow and nothing changed. Why?
Either the layer fills the entire canvas, so there is no transparent area for the shadow to show through, or the shadow was applied to the background layer. Cut the subject out first, or apply the effect to a layer whose edges are transparent, then check that no other layer sits above it.
What radius and offset give a realistic shadow?
For a product on white: Offset Y 10–16, Offset X 0–4, Radius 12–20 in black. For a realistic look, use two passes — a tight contact shadow (Offset 4, Radius 6) plus a wide faint one (Offset 20, Radius 30 at 25–35% layer opacity). Values are in canvas pixels, so scale them with the image.
Can I remove a shadow after applying it?
The filter is applied to the layer, so Undo (Ctrl+Z) is the direct way back. To keep the option open, duplicate the layer before applying the shadow and work on the copy; delete the copy if you change your mind.
Related Tutorials
Take a transparent PNG, duplicate the layer twice, and build a tight contact shadow plus a wide ambient one, then compare against a single-pass shadow.